

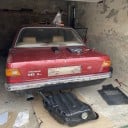
TC2 Restauration Project - A complete beginner's experience

  • Hey guys!


    Two years ago I was looking for a hobby as I was really bored. While I do work as a driver and loved cars since I was a kid - I entered this with no knowledge about anything and a will to learn.

    After finding a car in my quarter life crisis, one thing led to another and I was getting busier and busier with other life stuff, while the old Ford waited for me in the garage, day after day.


    In three months time I will be moving cross-country. Luckily, my inlaws will have a place where I can keep the car so my adventure won't stop then. However the goal is to get it to at least driving condition so I don't have to pay for it to get towed.


    The car is, well interesting.


    I don't have any photos from then, but ex owner seemed to be an "oldsmobile" fan. There was a racing steering wheel with an oldsmobile badge, he took out the original mask and put an oldsmobile one, and he put on chrome linings on the hood and doors.


    It is clear that he tried to go for a more "Racing" look, you will see from the photos. I'm going for a more original look, not necessarily 100% original, but something in the middle where I will like what I have.

  • The problems came very soon.


    Around one or two weeks after purchase, all of a sudden the engine wouldn't turn on anymore. It cranked and cranked, but also. If I put petrol directly in the carb, it would start no problem. So obviously there is a problem with the fuel sending.


    I already restored the fuel tank as well as ordered a new sending unit. The old one literally burned down. Don't know where and when. The wires around it are also almost reduced to ashes.


    Today I ordered some copper-nickel fuel pipes and removed the old ones from the car. Can't wait for the new stuff to come.


    I will show some more images when it comes to rust in the upcoming posts.


    Right now I have two problems


    1. How do I put the ring on the fuel sender??

    2. What tool did you use to remove the mirror on the left hand side? The Haynes manual says you need to have a special tool...


    See you soon!

  • Hello to Croatia!


    Welcome to our forum. You found the right place to get help and advice for your restoration project

    Rust is the No. 1 enemy for old Fords …


    I have no idea about the rubber ring.


    Regarding the adjustment pin of the mirror, you need to turn the outer chrome ring out counter-clockwise like a screw. Look for the little notches inside the ring

    Any snap ring pliars will do.

  • Thanks for the tips! I figured there should be an easier way to getting that off that wouldn't include their "tool" (which is nowhere to be found anyways).


    When we talk about rust, I started looking for some but I'm not yet pulling the whole car apart.


    For now, I noticed some on the sides, but even more importantly in the pockets above the back wheels. When I was purchasing the car it didn't appear in my mind to look here, but boy was it a nice surprise. It was "Fixed" with foam with the ex owner, but sooner or later it's going to have to be solved.

  • Depending where, the foam could be original made by Ford. Surprisingly they used foam in some parts of the body for at least 2 decades.

  • Foam was advertised by the foam-manufacturer as sound-silencing and corrosion preventive. Don't trust advertisements...

    But the management in Cologne (or Detroit) did. :stupid:


    However now you can either pull the whole car apart and rasssemble after all corrosion was removed and repaired, or do it section by section as a rolling restauration.


    Next surprise will be found, when removing the fenders. And lower corners of the windshield frame/vent box... coyo

  • "Luckily" the car was in a mostly dry and sunny area of the country the past 30 years, so I hope this will be kept at a minimum. Due to my circumstances I'm definitely going to have to do a rolling restauration.


    All the foam I've found is above the rear whell wells (which we call "pockets" in Croatia).

  • As DC said, this foam is in there since the car was produced.

    If there is no welding to be done in this area, just leave the foam where it is. It‘s original!

  • Today I took out the seats to get a view of the floor situation. As always, one stubborn (and probably rusty) bolt got the better of me today, it was the one under the right side seatbelt holder.


    So I didn't manage to check the right side but I did check the driver's one. And how would you access the lower level of metal - below the rear seats - images 3 and 5?


    Front door sill seems okay, but rear door sill has a few problems as you can see on the photos. Nothing to do about it now but at least I'll get a chance to clean up all the dirt that has accumulated.


    Of course, motomobil has completely new parts :D


    After the clean up, I'll have to jack the car up. Where would be the best place to put the car jack and axle stands for the rear and front? Is it safe to put axle stands under the axle, as the name says?


    Then goes trying to get it to run. Setting up the fuel lines (I got 90/10 kunifer pipes) and the tank. I still haven't realised how to put the fuel sender back in its place though.


    Thanks for the advices and help!

  • In the back you may use axle stands. In the front I would suggest to put the stands under the frame rail near the mounts for the jack.

  • With a lot of help from my girlfriend, the fuel tank is back in position. Funny thing however - it looks like the gaskets (both original and motomobil) dont fit on motomobil fuel sender.


    So i managed to find some xyz thin gasket of the same size and managed to lock in the sender.


    I’m going to need to do some more bending of the straps because as you can see, theyre a bit crooked. Fuel lines fit and Look Well though.


    Did it turn on? Unfortunately no. There is no spark. Spark plugs and cables Are new and connections seem to be all in good shape…


    However i noticed something Weird when it comes to the ignition coil. The two wires (Circled in Yellow) on the left- both lead to the distributor cap, while the right one is earth. Shouldnt there be a wire connection to the starter?

  • This looks like there is something electronic in the distributer instead of a contact. The contact needs only one wire from the coil to the contact.

  • Yeah I figured the coil is okay. When I do the spark test on the engine block I’m Getting no spark.


    Plugs Are a few Years old but Look good. I only manage to take out the first 2 from the radiator, the other 2 seem seized, going to have to get some tools to get it out. Not working with a t-wrench.

  • VIDEO


    I noticed the red wire and the black/yellow one at the starter werent connected properly. So i did that a bit better and now I can hear some hissing noise while cranking. Even without it, it sounds like she is gonna start any second.


    Fuel going right up to carb, tried putting it inside directly, not turning on. Spark plugs are fine, distributor too (its an aftermarket one). I tried to test the coil by putting red on + and black needle on -, both on the coil. Not Getting any reading so am I doing it wrong?

  • Another way to test your coil;

    • Remove all wires from coil (!!)
    • Put multimeter to Ω
    • Measure primary coil resistance in between terminal "15" (or "+") and terminal "31" (or "-").
      Result should be something in the range of approximately near 1 Ohm and 3.X Ohms (depends on type of ignition system / coil).
    • Put multimeter to kΩ or MΩ
    • Measure secondary resistance in between terminal "4" (this is the centre terminal for the HV cable to the dizzy) and terminal "31" (or "-"). Result should be something in the range of approximately 10 kΩ to 20kΩ.

    If you get these results the coil should be ok. Some coils are filled with oil for cooling purposes. You will notice that if you shake the coil. There should no oil be leaking from the coil.
    Some coils have a little "plug", usually near terminal "4" which must not be lost or damaged. This "plug" will be "blown out" if the coil overheats.


    If your system is still operated by points the capacitor cable must not be shorted to ground.
    If your system uses a Hot Spark (or similar) the capacitor must be removed!


    I am slightly confused what the "hissing sound" may mean ...


    Maybe the distributor is dialled in wrong.

  • Your video is inaccessible for me.


    Are you getting any spark yet (against the block?)


    If you have a shiny new aftermarket distributor from China, that might very well be the problem… it might just be DOA.

  • Gude

    Do you have a Checklamp ( a bulb with a bit of wire) ? Ground (31) Battery on one end of the wire, the other side of the wire on coil 15, is the bulb on ? Your problem is maybe the switch in the distributor. Do you have a picture from inside without the cap?


    on your coil are 3 connection points: in the middle is 4 ignition cable to distribute cap, on the side is 15 (Battery positive) and the last one on the other side is 1 ( Battery negative switched from distributor)

  • First, I fixed the video so now you can check it out. As it only started hissing after I fixed the starter wire and did some aligning with spark plugs and the cables its possible that the cable is loose. Unfortunately I don't have a multimeter but it looks like I'll have to get one on monday once the stores are open again.


    What do the terminal numbers mean?


    Your video is inaccessible for me.


    Are you getting any spark yet (against the block?)


    If you have a shiny new aftermarket distributor from China, that might very well be the problem… it might just be DOA.


    Video accessible now.


    A few days ago there was some spark against the block, now when I tried it today not. Maybe I just put it on a wrong part.

    The distributor is a few years old and worked in the start, but yeah it could be faulty.


    Here are a few photos of it

  • Gude

    Do you have a Checklamp ( a bulb with a bit of wire) ? Ground (31) Battery on one end of the wire, the other side of the wire on coil 15, is the bulb on ? Your problem is maybe the switch in the distributor. Do you have a picture from inside without the cap?


    on your coil are 3 connection points: in the middle is 4 ignition cable to distribute cap, on the side is 15 (Battery positive) and the last one on the other side is 1 ( Battery negative switched from distributor)

    I have this thing for measuring. You can see photo of the distributor on the above comment.

    Is this right?


    The 1 on the right goes toward a little box. In here one side goes to ground and another side goes toward the ignition under steering wheel.

  • Gude

    The voltage tester is okay for the following tests.


    I repeat: the blue cable in the middle is 4

    there is no 31 on the coil! It is a negative signal from distributor switch, its called 1

    the red cable is 15, coming from the car in black and goes to the coil and as red to the little ecu in the distributor

    First you have to check with the voltage tester from battery negative to the red cable on the coil when the ignition is on ( red battery lamp is on)

    Einmal editiert, zuletzt von Jörg ()

  • Okay, I tested this.


    Test number 1 with 15 and 31 shows between 2.2 and 2.4 (when multimeter Set on 200 ohms)


    Test 2 with red on 4 and black on 31 shows 7.68 ohms precisely when multimeter is Set on 20k ohms.


    Could this be the fault

  • ... 15 and 31 shows between 2.2 and 2.4 (when multimeter Set on 200 ohms)

    ... 4 and 31 shows 7.68 ohms ... multimeter is Set on 20k ohms.

    If you set your multimeter to 20kOhms it will display all resistors in kOhm, so 7.68 means 7680 Ohms which sounds reasonable ... Assumingly your coil is ok.

    Do you have any device to measure the ignition timing of your engine precisely?

    Another test: The engine must be put to top dead centre (TDC), with both valves of cylinder 1 (front of engine) closed. In this position the rotor arm in your distributor should point roughly in a direction where spark plug #1 is connected to the dizzy cap. Normally you will find a little mark in the upper rim of your dizzy but I do not notice any in your photo. So I think your dizzy is not set up correctly!

  • If you set your multimeter to 20kOhms it will display all resistors in kOhm, so 7.68 means 7680 Ohms which sounds reasonable ... Assumingly your coil is ok.

    Do you have any device to measure the ignition timing of your engine precisely?

    Another test: The engine must be put to top dead centre (TDC), with both valves of cylinder 1 (front of engine) closed. In this position the rotor arm in your distributor should point roughly in a direction where spark plug #1 is connected to the dizzy cap. Normally you will find a little mark in the upper rim of your dizzy but I do not notice any in your photo. So I think your dizzy is not set up correctly!

    Unfortunately I dont have a device to precisely check the timing..


    How would I start this test? Do i take off the engine cover to see the cylinders?


    I played with the dissy a bit a few weeks ago so its possible i also moved something.


    The screw is there i just took it out to check the condenser.


    I took time to check the wire and groundings so i did some cleaning with the wires. Unfortunately the wire connecting battery to engine is not in its best condition… Where could I find a new one? Perhaps motomobil 🤣

  • Give me a little time to write something more detailed for further tests.

    For this moment: I am sorry to tell you that - without an ignition timing light - you will only manage to adjust ignition correctly "by accident" and Murphy's Law will not make this easy. :rolleyes

    If you are lucky, you will be able to see the two cams of cylinder #1 through the oil filler... Both cams, inlet and exhaust, have to point upwards symmetrically, which means that both valves are closed.

    Fortunately there is another way forward which is not precise but it will vget the engine running:

    Try to get the position of crankshaft, camshaft and dizzy as close as possible to the following ... However do not alter the timing belt position on its pulleys in any way ...

    Only turn the engine in its normal direction (clockwise in the pic)!!


    This position is about correct for the components and the engine should start, but maybe runs very rough. Very slightly turn your dizzy until the warm engine runs smoothly ... This is the best we can do for the moment ... Will put up more info and pics as soon as I find them in my data backup ...

    If you have questions, just don't hesitate to ask ...

  • Gude

    Auch wenn die Zündung nicht genau stimmt, fehlt ja der Funke.

    Have you checked the voltage on the coil ? The negative cable from battery to the engine block is fixed now?

  • Thank you for detailed help and answers.


    Ignition Light is on its way but until that I’m gonna have to try the old way.


    If I understand correctly. I have to take off the oil filter and then ?turn? The engine if they are not upwards symetrically.


    If I do what’s explained on the photograph, how do I get to the crankshaft. Do i remove the green or yellow part (circled on the photograph)?


    One one of my photos before you can see the rotor arm. Is that the correct or opposite position?


    @Jorg


    I didn’t check between battery and coil positive yet. What do you mean negativne cable between engine block and battery. The one i photographed today goes from + on battery to engine block.


    As for the spark. I don’t know whats happening. I’m an amateur (obviously) but when I tested it a few days ago there was spark on the plug and now none.


    Thank you for the help


    Going to garage tomorrow morning (its not near my appartment) to spend some more time there